This forum is in archive mode. You will not be able to post new content.

Show Posts

This section allows you to view all posts made by this member. Note that you can only see posts made in areas you currently have access to.


Topics - iTpHo3NiX

Pages: [1] 2 3 ... 8
1
Hardware / Raspberry Pi 3 Released
« on: February 29, 2016, 05:39:37 PM »
Source: https://www.raspberrypi.org/blog/raspberry-pi-3-on-sale/


Quote from: raspberrypi.org
Exactly four years ago, on 29 February 2012, we unleashed the original 256MB Raspberry Pi Model B on a largely unsuspecting world. Since then, we’ve shipped over eight million units, including three million units of Raspberry Pi 2, making us the UK’s all-time best-selling computer. The Raspberry Pi Foundation has grown from a handful of volunteers to have over sixty full-time employees, including our new friends from Code Club. We’ve sent a Raspberry Pi to the International Space Station and are training teachers around the world through our Picademy program.

In celebration of our fourth birthday, we thought it would be fun to release something new. Accordingly, Raspberry Pi 3 is now on sale for $35 (the same price as the existing Raspberry Pi 2), featuring:

A 1.2GHz 64-bit quad-core ARM Cortex-A53 CPU (~10x the performance of Raspberry Pi 1)
Integrated 802.11n wireless LAN and Bluetooth 4.1
Complete compatibility with Raspberry Pi 1 and 2

BCM2837, BCM43438 AND RASPBERRY PI 3
Quote from: raspberrypi.org
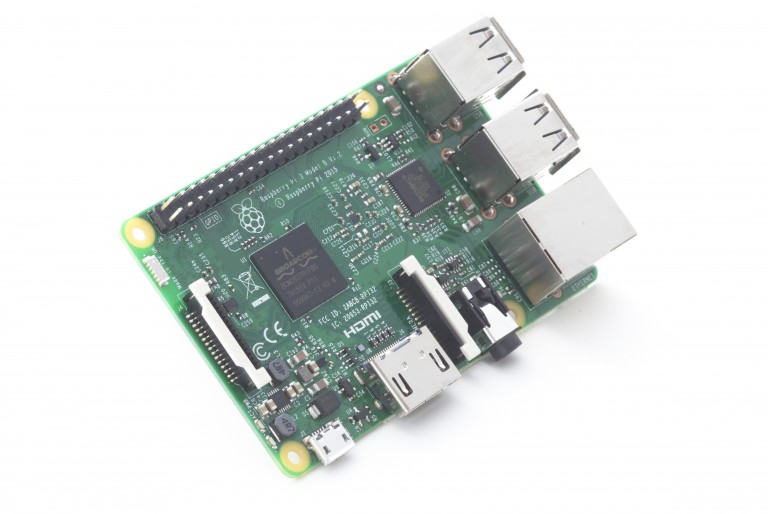
For Raspberry Pi 3, Broadcom have supported us with a new SoC, BCM2837. This retains the same basic architecture as its predecessors BCM2835 and BCM2836, so all those projects and tutorials which rely on the precise details of the Raspberry Pi hardware will continue to work. The 900MHz 32-bit quad-core ARM Cortex-A7 CPU complex has been replaced by a custom-hardened 1.2GHz 64-bit quad-core ARM Cortex-A53. Combining a 33% increase in clock speed with various architectural enhancements, this provides a 50-60% increase in performance in 32-bit mode versus Raspberry Pi 2, or roughly a factor of ten over the original Raspberry Pi.

James Adams spent the second half of 2015 designing a series of prototypes, incorporating BCM2837 alongside the BCM43438 wireless “combo” chip. He was able to fit the wireless functionality into very nearly the same form-factor as the Raspberry Pi 1 Model B+ and Raspberry Pi 2 Model B; the only change is to the position of the LEDs, which have moved to the other side of the SD card socket to make room for the antenna. Roger Thornton ran the extensive (and expensive) wireless conformance campaign, allowing us to launch in almost all countries simultaneously. Phil Elwell developed the wireless LAN and Bluetooth software.

All of the connectors are in the same place and have the same functionality, and the board can still be run from a 5V micro-USB power adapter. This time round, we’re recommending a 2.5A adapter if you want to connect power-hungry USB devices to the Raspberry Pi.

Raspberry Pi 3 is available to buy today from our partners element14 and RS Components, and other resellers. You’ll need a recent NOOBS or Raspbian image from our downloads page. At launch, we are using the same 32-bit Raspbian userland that we use on other Raspberry Pi devices; over the next few months we will investigate whether there is value in moving to 64-bit mode.

Purchase from:
http://uk.rs-online.com/web/generalDisplay.html?id=raspberrypi
https://www.element14.com/community/community/raspberry-pi

2
News and Announcements / New Global Mod and Some News
« on: February 26, 2016, 09:07:46 PM »
Fellow EvilZone members,

Today was like every other day and I decided to hop on my good pal EZ. To my dismay I went to look at my unread topics and I clicked on a few. In any case that set me off. I've been sickend by the shear crap that's being tolerated and I decided to change that. I hopped on IRC and asked if anyone cared about the forum was on and TheWormKill was the only reply to it. I got the opinion of the active members in the channel and have decided that anyone who is in the NULL category makes a post, it will automatically go into a moderation queue and requires approval from a Mod, GMod, Admin, or Owner. With this, will keep our current staff busy so I elected to promote TheWormKill to GMod as he has been a local mod for our most problematic boards for a while now.

Message to current Local Mods
If we end up being in need of more staff whether it be for a specific category or globally to assist, let me know if you're interested.

Hopefully we can break this shit post downward spiral.

So everyon, welcome the reaper of worms, thewormkill, to our staff team

<thewormkill sneaking his message in>
thanks everyone :)
</thewormkill out>

3
Android / [APP] Pandora 6.9 Patched
« on: February 16, 2016, 07:20:24 PM »
Pandora v6.9 Patched
Requirements: Android 4.1+
Overview: Pandora is free, personalized radio that plays music and comedy you'll love.


Great music discovery is effortless and free with Pandora. Just start with the name of one of your favorite artists, songs, genres or composers and we'll do the rest. It's easy to create personalized stations that play only music you'll love.
Tap into an entire world of music, including almost a century of popular recordings - new and old, well known and obscure. Create up to 100 personalized radio stations with your free account.
Not sure where to start? Create a free account to explore hundreds of music and comedy genre stations.
Already a Pandora listener? Even easier. Just log in and enjoy the same free radio service. Your Pandora is the same across the web, on your phone, on your TV, and in your car - access your free personalized radio wherever you want to hear great music or comedy.
Note: Pandora may use large amounts of data and carrier data charges may apply. For best results, we recommend you connect your device to trusted WiFi networks when available.

Unlimited Skips, No Ads, No Timeout, Music Downloader, MP3, 192kbps Pandora One support
Courtesy of Hunter X

This app has no advertisements

More Info:
https://play.google.com/store/apps/details?id=com.pandora.android

Download:
Pandora v6.9 Patched.apk

Source:
Pandora v6.9 Patched

Note: Download at your own risk. This is an unsigned APK and apps like Lookout will warn you that this is signed with Android Compromised Master Key. I, or EvilZone.org, are not responsible or liable for any damage that you may incur by using this patched application

4
General discussion / Got my new internet installed :D
« on: December 14, 2015, 09:36:43 PM »


Not too shabby, that's hardwired. Over wifi getting 45mbps :D

5
News and Announcements / EvilZone's Certification Training Grounds
« on: December 10, 2015, 10:14:11 PM »
In a fit of boredom I decided to make the Certification Training Grounds a reality. TheWormKill is the moderator and will do his best to keep it the crap posts. You can find the new category and boards here

As always if the boards flop I'll remove them (not the content, but the boards)

Hope you guys like it

Special Note:

If you happen to come across an old thread that has to do with certifications please use the report button so I can move it to the appropriate category. Thanks in advance for your help

6
General discussion / Birth of a New Meme
« on: December 04, 2015, 09:29:03 PM »
I found an image and it will need to become a viral meme, what better way to do that then to ask what would make this potential meme be fucking awesomely hilarious


Obviously we have thought of Tits or GTFO, but that won't go viral like it should.


7
News and Announcements / Official EvilZone Gitlab
« on: November 30, 2015, 07:29:14 PM »
EvilZone Administration has released a git service for its members! This service is for all you coders out there to utilize this service for your own private and public git.

Access:
http://git.evilzone.org

Please note you will need to register a new account, as well as the confirmation for this account will go to spam. We're currently working on a fix.

Check it out and hope to see some projects.

Thanks to ande for setting it up
Thanks to iTpHo3NiX for purchasing the server

8
Operating System / So I installed Arch
« on: November 30, 2015, 04:32:46 AM »
Well tbh being a newish nix user, only really using variants of Debian mainly for LAMP setups and Kali. I'm familiar with the command line, but I wouldn't consider myself an intermediate user by any means I was able to install Arch without much hassle thanks to lifehackers guide and some help from blindfuzzy.

Anyways here's what I did to install Arch, in a quick and dirty fashion

1. Gparted Live CD (booted off USB)
So I started off by formatting 2 of my drives to ext4, they were /dev/sdc (OS drive 120GB SSD) and /dev/sde (Data drive 500GB HD)

Quick and easy, no moar winblowz

2. Latest Arch ISO (USB Boot)
Ran:
Code: [Select]
ping -c 3 www.google.comOk, I was connected to the internet

Then I ran the following stuffs:
Code: [Select]
mount /dev/sdc1 /mnt
mkdir /mnt/home
mount /dev/sde1 /mnt/home

Then I made my mirror on the top of the list that was closest to me.
Code: [Select]
nano /etc/pacman.d/mirrorlistCTRL+X after doing so then saved the file

Installed Arch base, I didn't modify it, just installed all of it
Code: [Select]
pacstrap -I /mnt base
Generated fstab
Code: [Select]
genfstab -U -P /mnt >> /mnt/etc/fstab
Ok, now time to connect to my Arch install
Code: [Select]
arch-chroot /mntCreated locale files like so
Code: [Select]
nano /etc/locale.genI uncommented en_US.UTF-8 CTRL+X and saved

I then created a locale.conf file like so
Code: [Select]
echo LANG=en_US.UTF-8 > /etc/locale.conf
export LANG=en_US.UTF-8

Then set up timezone and clock
Code: [Select]
ln -S /usr/share/zoneinfo/America/Los_Angeles /etc/localtimeThen
Code: [Select]
hwclock --systohc --utc
Then it was network time, now this had caused some issue, as for some reason my network card was called enp10s0 instead of eth0, so if you end up having trouble, check your network adapters.
Code: [Select]
systemctl enable dhcpcd@eth0.serviceThis is for hardwired, there's extra steps for wife, but this is my install, so deal with it.

I then configed my pacman as I'm on a x64 system
Code: [Select]
nano /etc/pacman.confAnd uncommented the multilib option

Ran the following to update my repos
Code: [Select]
pacman -Sy
Ok then I set up my root password and then my user account

Code: [Select]
passwd
<enter root pass and confirm>
useradd -m -g users -G wheel,storage,power -S /bin/bash itpho3nix
passwd itpho3nix
<enter pass and confirm>

Now I setup sudo

Code: [Select]
pacman -S sudo
I then edited the sudo config

Code: [Select]
EDITOR=nano visudoI uncommented the %wheel ALL=(ALL) ALL and saved

Time to install grub, here I fucked up and forgot to make the config, so I had to go back and fix that

Code: [Select]
pacman -S grub-bios
grub-install --target=i386-pc --recheck /dev/sdc
cp /usr/share/locale/en\@quot/LC_MESSAGES/grub.mo /boot/grub/locale/en.mo
grub-mkconfig -O /boot/grub/grub.cfg

Then time to unmount and reboot (removed USB after reboot)

Code: [Select]
umount /mnt/home
umount /mnt
reboot

Ok now I'm into my new Arch install, however I was having issues connected to the internet until I leaned my adapter was called enp10s0, so my commands were as follows
Code: [Select]
dhcpcd enps10s0And I was then online

I'm going to skip sound, because I haven't got it working yet, maybe TheWormKill will be able to help me later :-P

Ok time for the X window system
Code: [Select]
sudo pacman -S xorg-server xorg-xinit xorg-server-utils
I installed nVidia shits
Code: [Select]
sudo pacman -S nvidia lib32-nvidia-utils
Then time to make sure gui works
Code: [Select]
sudo pacman -S xorg-twm xorg-xclock xterm
start

Yay! It worked now I wanted xfce so I did the following

Code: [Select]
sudo pacman -S xfce4 slim
At the time, I didn't know, but I soon learned, I needed a login manager and whatnot, which is where I also ran into my other issue, I also installed SLiM which I included in the above command. Also I had issues logging in, but how it was corrected after a bit of googling was creating a file in my home directory
Code: [Select]
cd ~
nano .xinitrc

Then added
exec xfce4-session and saved

Then ran the following:
Code: [Select]
sudo systemctl enable slim.service
Rebooted and I was all set up and in

Yay. I welcome myself to the members amungst the Arch master race

-------------------
EDIT
-------------------

So I fixed my audio issue, thanks to straycat and Sinister

Ran the following
Code: [Select]
sudo pacman -S pulseaudio puvacontrol
pulseaudio --start
puvacontrol

Then it was a matter of selecting my appropriate device which is kind of unconventional as its via HDMI to my monitor. But alas, I got it working

So another little issue I was having was my time wasnt correct. For some reason it was about 12 hours off. What's weird is I was set to the right timezone and whatnot, but hey whatever. So I decided to use internet time to ensure its correct :P

Code: [Select]
sudo pacman -S ntp
ntpd -qg

After a minute or 2, there it was nice and fixed and synced via network.

9
Found it on the Webs / Li-Fi - The Future of Wireless Technology
« on: November 28, 2015, 09:16:27 PM »
https://youtu.be/NaoSp4NpkGg

WiFi through lightbulbs... Fucking technology. Also said to be roughly 100 times faster than WiFi.

10
Found it on the Webs / IP leak affecting VPN providers with port forwarding
« on: November 27, 2015, 02:10:07 AM »
https://www.perfect-privacy.com/blog/2015/11/26/ip-leak-vulnerability-affecting-vpn-providers-with-port-forwarding/

Vulnerability “Port Fail” reveals real IP address
We have discovered a vulnerability in a number of providers that allows an attacker to expose the real IP address of a victim. “Port Fail” affects VPN providers that offer port forwarding and have no protection against this specific attack. Perfect Privacy users are protected from this attack.

This IP leak affects all users: The victim does not need to use port forwarding, only the attacker has to set it up.

We have tested this with nine prominent VPN providers that offer port forwarding. Five of those were vulnerable to the attack and have been notified in advance so they could fix this issue before publication. However, other VPN providers may be vulnerable to this attack as we could not possibly test all existing VPN providers.

11
Found it on the Webs / Sci-Hub, LibGen, and BookFi returns
« on: November 22, 2015, 06:19:06 AM »
https://torrentfreak.com/sci-hub-and-libgen-resurface-after-being-shut-down-151121/

Sci-Hub even got themselves an onion address. Good to know these admins aren't going to lie down.

12
Hacking and Security / Social Engineering Story Sharing
« on: November 18, 2015, 05:24:56 PM »
Hey guys! Welcome to my new thread. This thread is meant to share your SE stories with the community! Me being me, I love social engineering and its fun to exploit everyday people by different methods. This thread will serve as a play ground for sharing any stories you have using Social Engineering.

Story 1:
Title: The old days

Back in the olden times of EvilZone, say about 2007/2008 I had a pretty nice MySpace Phishing exploit that I found and decided to get to work. At the time I was running my own forum under RagnorakFX.net and had a phishing page I added to the host (MySpace.RagnorakFX.net) and it was a simple phisher. I then got a dumped MySpace user:passes booted up ultrasurf/freegate and got to work. I logged into several MySpace's and added a few lines of HTML that masked pretty much the entire page with a blank .gif that made it so anywhere you clicked, add friend, message friend, add comment, etc, would redirect them to my Phishing page. I would then log in to those and repeat the process. At the end of this, I had about 10,000 unique MySpace user names and passwords which I dumped on EvilZone. However my story isn't done there. I remember testing a few of them against email accounts and hit one. This guy used the same password for MySpace as well as his yahoo mail. When looking through his email I discovered that he recently bought a Mac through PayPal. I was curious... Went to PayPal, incorrect password so I reset it and deleted the emails. So at the time I was heavy in the torrent scene trying to get into all those special trackers. Well I had 1 highly sought after tracker at the time which I will not name for my protection as I'm still an active account holder. Anyways this tracker was and still is a top tracker and I was in the invite trading game. This tracker gave you invites for donations. I started making donations at 50€ for 5 invites (+other goodies) eventually I hit 20 invites and then did a few 10€ donations. In the end, I burned this guy's PayPal and ended up with 23 invites... However the trickery wasn't quite over. Knowing that these transactions would get charged back I waited to hear back from staff at the site. About 3 days later I was pm'd by a staff member. Let the magic continue... I had made a legitimate donation before and explained that my account was hacked and I was already talking to PayPal and the individual that I used his account. I informed them that I was sorry and that the only email any donations would come from was <my PayPal email> he had me email him from my PayPal email to confirm it was me and let me keep my account and the invites I received slipped his mind. So now I had my account in good standing, 23 invites, and a job well done. I then used these invites to get into several other top tier trackers that eventually led me to have most of the top trackers in the world and a heavy presence on several trackers which eventually led me to the p2p scene. Job well done iTpHo3NiX

Story 2:
Title: The Custom Controller
Fast forward to Yesterday (11/17/15) I accomplished a little SE that presented itself due to a faulty one I paid for. I contacted them and politely told them of the issue. I had done a little bit more research and found on 3rd party sites they're not very popular and oftenly treated like shit from some of their customers. I used this to my advantage, and decides I would play the poor not upset customer. In my initial email, I explained the issue in detail and the guy got back to me with a return label and an apology saying that it was "damaged in transit" which i know was not the case. Instead of calling them out on it, I played along. Still being oh so nice i informed him that i packaged up the controller and sent it out. At this point i asked if it was possible to add my additional customizations, Sensitive buttons ($19.99 customization) chrome gold triggers ($5.99) pro buttons ($19.99) and a red LED ($19.99). He responded with "Thank you for your time and understanding! I can have these added at no cost to you. Please let me know if you need any further assistance in the meantime, I would be happy to help." At this point I thanked him and am currently waiting for my new controller to arrive in a few days (probably Monday). I also expect a few additional goodies to come with my controller because of how nice I decided to be.

So now there is a large gap between my first story and my second story and I do have more that I can share, however I'd like to hear some of your guy's SE stories so I can enjoy before sharing.

So what are your SE stories?

13
Creative Arts / [EZA2] Nasty Freestyle - Unamed rap
« on: October 30, 2015, 05:40:24 PM »
https://youtu.be/xiNvmViiG2g
T-Wayne - Nasty Freestyle Instrumental

Still rough and need more. Feel free to contribute ideas

Quote
I hop on your box wait for the fuckin dox
Ain't nothin u can do except call the cops
Got my proxies running through mutha fuckin SOCKS
That's right I'm tunneled into your box

I'm the king of this shit and I can fuckin hit
I'm barely getting started you already upset
Got my phish game set how much you wanna bet
I'll take yo bitch next and make her pussy wet
Im a mutha fuckin haxor ain't nothin u can do
You a bitch boi nigga, that is fuckin true
If there ain't nothin good then this is what I'll do

I'll drop all your info and
Run up all yo cards
I ain't worried bout ur bitch ass
Cuz nigga I'm in charge
I own all yo shit and I won't fuckin quit
I'll sick Puddi on yo ass with is 16 inch dick
I'm a mutha fuckin legend and ur a little prick
I drop these verses leavin ur body in hearses
I havested ur info and dropped a Reverse
Your system now belongs to me, and no I won't give you
The mutha fuckin key

Still rough and will need to change some words, for now it's a work in progress but I need some more inspiration

14
//////////////////////////////////////////////////////////////////////////////////
// Paper: Putting Together a Soldering Kit and Soldering Basics //
// By: iTpHo3NiX //
// Rev: 0.0.1 //
// Date: 10.25.15 //
//////////////////////////////////////////////////////////////////////////////////

Contents

Putting Together your Soldering Kit
1.1 Solder
1.2 Soldering Iron
1.3 Soldering Iron Stand
1.4 Wire-Modifying Tools
1.5 Clips and Clamps
1.6 Liquid Flux
1.7 Heat-Shrink Tubing
1.8 Tip Cleaner
1.9 Exhaust Fan
1.10 Safety Goggles

Learn Soldering Basics
2.1 Soldering Wires
2.2 Soldering a Circuit Board
2.3 Tinning

Who is This Tutorial For?
Before you continue reading, I would like to say that this tutorial is geared at the ABSOLUTE novice. Absolutely no knowledge of soldering or soldering equipment is necessary. If you are looking for a more advanced guide, this is not it. I wasn't kidding when I put basics in the title. If you're already a pro-solderer, go ahead and either skip or feel free to add input.

Put Together a Soldering Kit

Soldering is playing with fire, or at least with hot metal. So we need to be sure we have the right tools. If you're working on electronics projects, chances are you'll want to connect lightweight metal objects like wires, and soldering is the way to get that done. You heat pieces of metal with a soldering iron, then join them together using a molten filler, or solder. Once it cools and hardens, you're left with a strong, electronically conductive bond.

Solder
This is the good stuff - the material you'll melt to connect metals. Traditionally, solder was a mix of tin and lead, but these days look for lead-free types to avoid nasty health risks. Choose thinner solder for delicate projects, such as attaching wires to a circuit board, and thinker solder for projects involving heftier wires or bulkier pieces of metal.

Soldering Iron
This tool has a metal tip and an insulated handle. When it's powered on, the tip heats up so it can melt solder. There are low- and high-wattage versions: Low wattage is useful for fragile projects, while high wattage is better for projects involving bigger pieces. There are also different types of tips available for the soldering iron.

Soldering Iron Stand
Buy a stand that fits your iron so you'll have a place to put it down safely when it's hot. (Leaving this thing lying around when it's turned on is a good way to burn down the tool-shed before you've even made anything with it!)

Wire-Modifying Tools
You'll likely be soldering a lot of wire, so it's useful to have wire cutters, wire strippers, and needle-nose pliers on hand so you can manipulate the wire. Before connecting wires, you must peel back their insulation to expose the wires, so wire strippers are definitely a must.

Clips and Clamps
Soldering requires both hands, so you'll need something to hold the materials you're soldering in place. Clips, clamps, and even electrical tape can do the job.

Liquid Flux
Soldering works best when the items being soldered are squeaky clean, so have liquid flux on hand, it chases away oxides and other goop that can make soldering difficult.

Heat-Shrink Tubing
You can use plastic heat-shrink tubing to insulate wires before you apply heat and solder them. It's available in several diameters for projects with various wire sizes.

Tip Cleaner
Your soldering iron's tip will get a bit nasty as you work, so keep a wet sponge on hand to periodically wipe down the tip.

Exhaust Fan
The fumes from soldering are not healthy to breathe, so you need good ventilation from a fan or an open window to help clear the air

Safety Goggles
Bits of hot solder can go flying as you work, so don't do it without wearing safety goggles. Or do, what do I care.

Now that we have a good idea on what we should include in our Soldering Kit, lets get on to the basic steps of soldering.

Learn Soldering Basics

As its most basic, soldering is simply attaching wires to wires. The process is a bit different when you're soldering directly onto a circuit board, but don't worry, I got you covered with info for each.

Soldering Wires
  • In a well-ventilated space, with your safety goggles on, plug in your soldering iron to heat it up. Be careful not to touch the tip, which heats up fast
  • Prepare the materials you want to join with solder. If you're connecting two wires, peel back any insulation about 1/2 inch (1.25cm), and twist the wires together. Place your materials on a surface you don't mind burning a bit, like scrap wood
  • Cut a length from the spool of solder and coil it up at one end, leaving a short lead. You can hold on to the coiled end as you apply the solder
  • Touch the iron to the point where the wires are twisted together. Leave it there until the wires are hot enough to melt the solder (about 10 seconds), then touch the solder to the wire joint every few seconds until it begins to melt. Allow enough solder to melt onto the wires to cover them, then pull the solder and soldering iron away. Don't touch the solder directly to the soldering iron during this process, that will melt the solder onto the wires, but won't form a firm joint.
  • When you need to fix a mistake, you can reheat your joint, melt the solder, and reposition the components. If you want to break the connection you made for any reason, you can desolder a joint. For connections like joined wires, you can often simply heat up the joint and pull the wires apart, or cut each wire below the join and resolder as desired.

Soldering a Circuit Board

  • Place the component that you wish to solder in the correct spot on the circuit board and clamp it down, then push the leads for each component through the holes on the board
  • Solder the leads to the bottom of the board. (This is easier to do with a fine-tipped, low-wattage soldering iron.) Press the soldering iron to the lead and the metal contact on the board at the point where you want them to connect. Once they heat up enough to melt the solder after a few seconds, melt a small amount of solder at the connection point. Too much solder can cause a short, too little solder won't make a string connection.
  • Pull the solder away, then remove the soldering iron a second or two later. Once you've soldered all the leads onto the circuit boar, trim off excess wire with a wire cutter.

Tinning

If you're working with components that have to be surface mounted on a circuit boar, such as ones that don't have leads, you can thread through to the back of the board, you'll need to use a technique called "tinning"

  • Touch the soldering iron to the point on the board where you want to attach the component. Melt a small drop of solder on this point, then remove the soldering iron.
  • Pick up the component with tweezers, heat up the drop of solder on the board, and carefully place the component on the solder.
  • Hold the component in place for a few seconds until the solder cools.
  • If you need to desolder joints on a circuit board, use a soldering pump with your soldering iron to melt and remove the solder.

Conclusion

Well I say a job well done, with this guide you learned what you need to get started soldering and how to do the basics.

15
Hardware / Raspberry Pi "Hacker Bundle" (Udemy)
« on: October 21, 2015, 04:05:42 PM »
So droid-life has a Udemy course bundle deal for $39. I thought I would share for those interested in purchasing it. The deal ends in 14 hours so get it while you can

https://deals.droid-life.com/sales/raspberry-pi-hacker-bundle?utm_source=StackSocial+Deals+Newsletter&utm_campaign=20151021_Android_DailyDeals_2366&utm_medium=email

Courses included are as follows:
  • Introduction to Raspberry Pi
  • Hardware Projects Using Raspberry Pi
  • Python Programming for Beginners
  • Real World Guide to Hardware Design
  • PiBot: Build Your Own Raspberry Pi-Powered Robot

Pages: [1] 2 3 ... 8


Want to be here? Contact Ande, Factionwars or Kulverstukas on the forum or at IRC.